
Summer Fun: Craftastic Creations with the Kids! (DIY Summer Craft Projects)
Hey parents, summer’s here, and the kids are bouncing off the walls with energy! While endless sunshine and playtime are awesome, keeping those little minds active is important too. That’s where DIY summer craft projects come in! They’re a fantastic way to unleash creativity, have some laughs together, and maybe even create some adorable decorations for your fridge (courtesy of your mini Picassos).
We’ve got three super fun and easy DIY summer craft project ideas to get you started, from blooming paper flowers to funky recycled robots. So grab some supplies, put on some tunes, and get ready for some messy (but worth it) crafting adventures!
As an Amazon Associate, I earn from qualifying purchases.
Paper Power! (Easy DIY Summer Craft Projects)
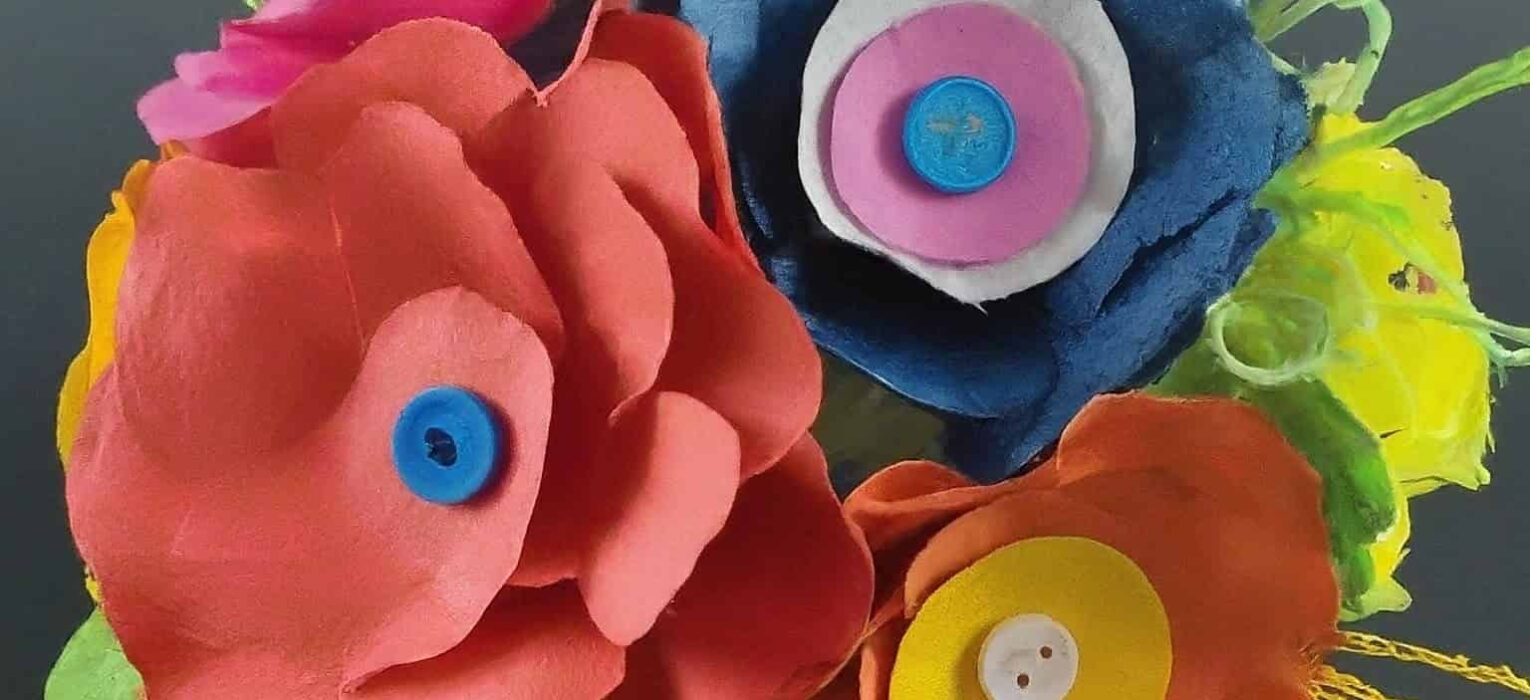
First up, let’s make some beautiful paper flowers! You’ll need construction paper, scissors, glue, and a pipe cleaner. We won’t tell if you sneak in some glitter glue for extra sparkle, either. Here’s how you can do it:
- Cut, cut, cut! To start, grab your construction paper and scissors. Cut out different-sized circles – these will be your flower petals! You can make all the circles the same size for a simpler flower, or try different sizes for a more full bloom.
- Pinch and curl! Once you have your circles cut out, try this cool trick to make them look more like flower petals. Just pinch the center of each circle between your thumb and forefinger, and then gently curl the edges outwards with your other hand. The more you curl, the frillier your flower will be!
- Stack and stick! Now comes the fun part: putting it all together! Here’s how: layer your circles from biggest to smallest, with a little dab of glue in the center to hold them together. Don’t worry, we’ll show you exactly how much glue to use in a bit so your flower isn’t swimming in a sticky mess.
- Stem time! Almost there! Try this: wrap the pipe cleaner around the bottom of your flower petals to create a stem. You can leave it plain or wrap some green construction paper around it for a more finished look.
- Blooming bud! Now for the best part – adding some personality! We’ll show you how to use buttons, markers, or even glitter to decorate the center of your flower and make it your own. Feeling fancy? You can even add some pipe cleaner leaves to complete your creation!
These paper flowers are a great way to personalize your child’s room or create a festive summer centerpiece. Plus, they’re super easy to make, so even the littlest crafters can get in on the fun. So grab your supplies and get ready to bloom!
——————————–
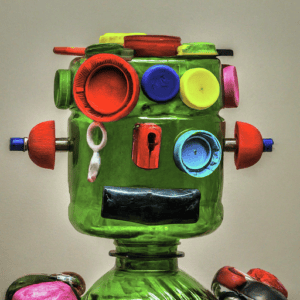
Recycled Robots on the Rise! (Fun DIY Summer Craft Projects)
Calling all eco-warriors! Let’s turn those empty cardboard boxes and plastic bottles into a whole army of awesome robots.
Here’s a step-by-step guide to turning those recyclables into awesome robots:
Gather Your Supplies:
- Cardboard boxes (different sizes for variety)
- Plastic bottles (various shapes and sizes)
- Milk cartons (optional, for rounded bodies)
- Aluminum cans (optional, for accents)
- Glue (hot glue or school glue, depending on materials)
- Markers, paint, or colored paper (for decorating)
- Scissors (for adult supervision)
- Anything else that sparks your imagination (bottle caps, buttons, googly eyes, etc.)
Step 1: Design Your Robot!
- Talk with your child about what kind of robot they want to build. Will it be a walking robot, a flying robot, or maybe one with a special tool?
- Sketch a basic design on paper or cardboard to plan out the body shape, limbs, and head.
Step 2: Build the Body
- Use cardboard boxes to create the main body of your robot. You can cut and connect them to form the desired shape.
- Plastic bottles can be used for the head, arms, or legs. Experiment with different sizes for a unique look.
- Milk cartons can be used for a round robot body or cut open to create arms.
Step 3: Connect the Pieces
- Use glue to secure the cardboard pieces and attach the plastic bottles. Hot glue works well for adult use, while school glue is safe for younger children.
Step 4: Add Details!
- Now comes the fun part – decorating! Use markers, paint, or colored paper to add facial features, buttons, and other details.
- Aluminum cans can be cut into shapes for claws, wings, or other robot parts.
- Bottle caps, buttons, and googly eyes can add personality and character to your creation.
Step 5: Power Up!
- Let your imagination run wild! Does your robot have any special features? You can add things like pipe cleaner antennas, cardboard wings, or even attach a small toy car as a rolling base.
Bonus Tip: If you want your robot to be extra sturdy, you can use recycled materials like egg cartons or cereal boxes for extra pieces and support.
Remember, there’s no right or wrong way to build a robot! The most important thing is to have fun, be creative, and reuse those recyclables to save the planet!
———————————
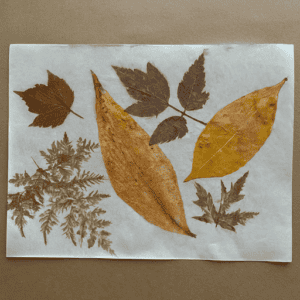
Nature’s Art Gallery (Perfect DIY Summer Crafts Project for Nature Lovers!)
Summer’s all about exploring the great outdoors, so why not bring a bit of nature inside with some leaf rubbings and collages? Take a walk in the park and collect some cool leaves, flowers, and maybe even some interesting rocks. Then, we’ll use crayons and paper to create beautiful leaf rubbings that look like magic! Feeling fancy? Let’s glue those collected treasures onto cardboard to make one-of-a-kind nature collages.
Here’s how to bring the outdoors in with some summery leaf rubbings and collages:
Step 1: Gather your supplies:
- Paper
- Crayons (in various colors)
- Leaves in different shapes and sizes (make sure they are dry and flat)
- Glue
- Cardboard
- Optional: Flowers, interesting rocks, and other interesting flat objects from nature
Step 2: Take a Nature Walk!
- Head outside to a park or an area with plenty of trees.
- Look for interesting leaves in different shapes, sizes, and colors.
- You can also collect some flowers, interesting rocks, or anything else flat and nature-inspired that catches your eye.
Step 3: Create Leaf Rubbings
- Place a leaf under a piece of paper on a flat surface.
- Choose a crayon color and rub the side of the crayon firmly over the entire surface of the leaf.
- The veins and details of the leaf will be transferred onto the paper like magic!
- Try different colored crayons and different leaves to create a variety of leaf rubbings.
Step 4: Design your Collage (Optional)
- If you want to create a collage, lay out your leaf rubbings and other natural treasures on a piece of cardboard.
- Experiment with different arrangements to find a design you like.
Step 5: Glue Everything Down!
- Once you’re happy with your design, use glue to adhere the leaf rubbings, flowers, rocks, and other items onto the cardboard.
Step 6: Let it Dry!
- Lay your collage flat and let the glue dry completely.
Step 7: Display Your Artwork!
- Hang your one-of-a-kind nature collage on the wall or display it proudly on a shelf. You can even make it into a greeting card!
Crafting with your kids is more than just fun; it helps develop their fine motor skills, sparks their imaginations, and creates lasting memories. So grab your supplies, unleash your creativity, and get ready for a summer full of “craftastic” creations! Parents and kids will love creating DIY Summer craft projects together! We can’t wait to see what amazing things you come up with – share your masterpieces with us in the comments below!
—————————————————-
Are any Swifties in the house? Check out this post from July 2023! Anne shares her once-in-a-lifetime concert experience here!
Have you tried pickleball yet? Check out Anne’s (along with her sister Carrie’s) YouTube channel dedicated to pickleball!

Kebba Buckley Button
Anne Z, welcome to the Ultimate Blog Challenge! What fun crafts you’ve got here! I will have to make some of those paper flowers for myself. And there are patterned papers at the crafts stores, to make it even more interesting. Thanks for a cheery and inspiring post!
Anne Z
Thanks for stopping by Kebba. I love the summer Ultimate Blog Challenge. And I love crafts during the summer too! It’s a match!
Florence Callender
Wow! You brought back many childhood memories with your crafts. My sister and I did lots of craft projects as children. I remember making paper flowers and putting some on greeting cards. Thanks the trip down memory lane.
Anne Z
Exactly Florence. Crafts were such a strong part of my childhood. Parents today might really enjoy doing them with their kids! Thanks for commenting!
Kristine
Love that robot! What a fantastic way to find resources for crafts, and such creative ideas! I look forward to your next post.
Anne Z
It’s a cute robot, isn’t it? Thanks for your comment Kristine!